Working With Homing
Orientation
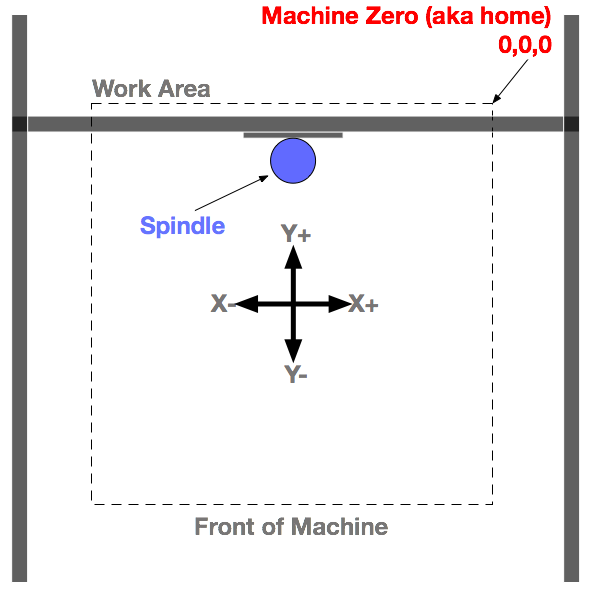
Here is a typical moving gantry CNC setup viewed from the ‘top’. Notice the X and Y arrows representing which way is positive and which way is negative.
The X axis moves to the right for the positive direction and to the left for the negative direction.
The Y axis moves forward (away from you if standing at the front of the machine) for the positive direction and towards you for the negative direction.
The Z axis moves up for positive moves and down for negative moves
Going Home
The home position on a CNC machine is a static, repeatable position. For true homing to work, the machine needs to have a set of switches on each axis that can be triggered by an object that does not move (such as an end plate or side plate of the frame).
When you ‘home’ your machine — you are telling it to go to this known position.
Although the homing sequence is configurable — the two most common positions are ‘back-right’ (the back right hand corner of the machine) or ‘front-left’ (the front left corner of the machine).
For the Shapeoko and Nomad machines (both run by GRBL) — we use the back right position.
When the homing command is issued ($h) — the machine will do the following proceedure:
- Begin Raising the Z axis (moving in the positive direction) until the switch has been triggered.
- Back off the switch (move in the negative direction) a few mm
- Begin to very slowly move back towards the switch until the switch is again triggered
- Back off the switch a set distance. This set distance is called homing pull-off and it is configurable by setting $27 equal to the value you want. The default value is 1mm
- After the Z-Axis has been homed — the X and Y axis will begin moving in the positive direction (X to the right, Y away from you) until their switches are triggered.
- Once the X and Y switches are triggered, they will perform the same routing as the Z-axis: Back off the switch, then move slowly towards the switch until it’s engaged, then back off the set distance (1mm).
Working With Homing
After homing is performed, you will notice that your software will show the coordinates as −1, −1, −1.
When each axis triggered it’s respective limit switch that was the 0 position for that axis.
The −1 comes from the ‘homing pull-off’ value we talked about in step #4.
The reason that it’s negative is because of how the coordinate system is setup (X- is to the left, Y- is towards the front, Z- is down).
The machine must perform ‘homing pull-off’ to get the axis off of the switch — otherwise Grbl will think the machine has tripped a limit (because the switch is engaged).
Why Back-Right?
On a more fundamental level, the question might be why the back right corner is a common position — when more than likely the front left corner is where you would normally start a job.
The best answer to that question is ‘because history’.
Historically, industrial CNC machines ‘home’ to the back right corner. If you’ve ever stood in front of one (or seen one being operated) — this homing position makes a lot of sense for a couple of reasons:
- It moves the spindle out of the way and gives the operator clear access to the work area.
- Most industrial machines are ‘moving table’ style machines — so ‘homing’ to the back right, actually brings the table closer to the operator — again making it easier to access the job.
On a gantry style machine (like Shapeoko) — homing to the front left makes sense except for the fact that the spindle will more than likely be exactly in the way of your workpiece if you needed to access it.
You might be asking yourself then how you are supposed to run a job if the 0,0,0 position is in the back right corner of the machine!
Working With Homing Putting it all together
Think of ‘home’ as a reference point that you will begin all of your jobs from. At any point in time you can issue the ‘home’ command and your machine will ALWAYS move back to that exact position.
Home is our starting reference point for every job.
This is how you are supposed to use the homing cycle:
- Home the machine ($h or use the home button)
- Jog the machine to where you want to start your job
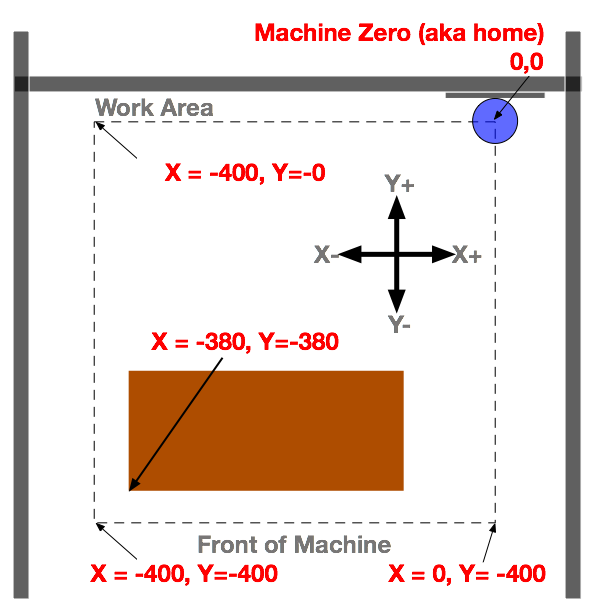
- Record the offset (this is going to be a negative X number and a negative Y number!)
- Zero all of your X and Y axis using the “zero” buttons, then zero your Z-axis
- Run your job!
The number you recorded in step #3 (called the offset) can be returned to anytime!

(jog to offset position)
(zero machine at offset position)
Practical Example
A common situation to use the homing, offsetting, and zeroing procedure would be to perform a tool change.
- Insert your first tool (let’s say a 1/4″ square end mill)
- Home Your Machine
- Jog to your offset position (X−380, Y−380)
-
Zero your X and Y axis (with the “zero” buttons)
- Zero your Z-axis by touching off the material
- Run the first part of your job (that uses the current tool)
When that part of the job finishes and you are ready to do a tool change you can power off the machine — you can even disconnect from Carbide Motion by closing the program.
- Change the bit in your tool (let’s say it’s a 1/8″ ball nose)
- Power on your machine and re-connect with Carbide Motion
- Run the homing cycle ($h)
- Jog to your offset (X−380, Y−380)
- Zero your X and Y axis (with the “zero” buttons)
- Zero your Z-axis by touching off the material
- Run the rest of your job
Another example of using the homing cycle and then offsetting routing would be if you setup some sort of fixturing to help you do the exact same job several times (such as a small production run).